Jellyfin is easy to start and surprisingly deep to operate well.
A container can be running in minutes. A dependable media service takes more thought. The application must be able to read the library, write its own database, reach metadata providers, serve several kinds of clients, survive an update, and recover when the host or storage fails. If a client cannot direct-play a file, the server may also need to decode, transform, and re-encode video in real time.
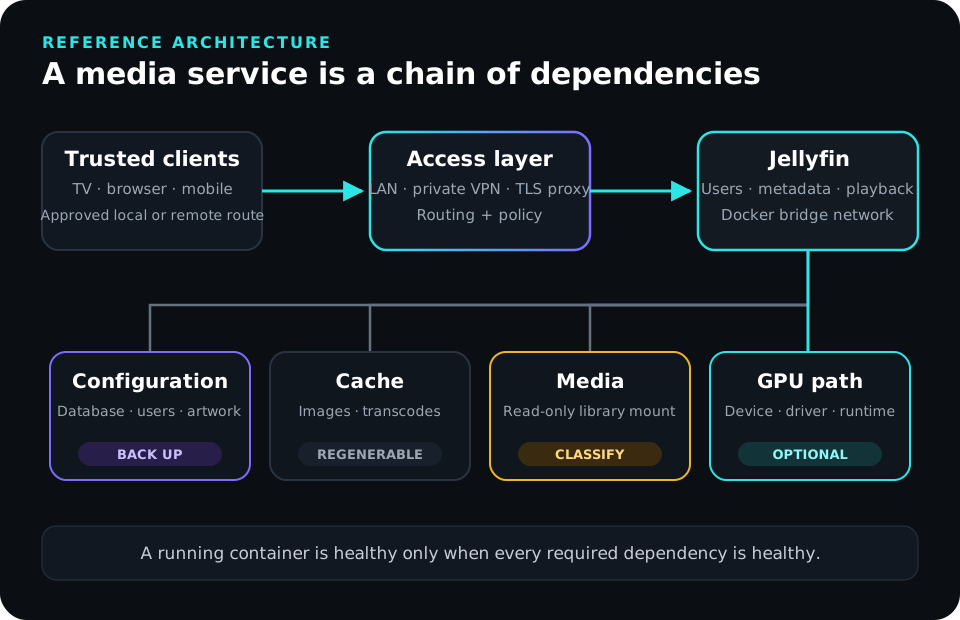
That is why a Jellyfin deployment is not only a Docker project. It is a storage, identity, networking, client-compatibility, and recovery project with a media interface on top.
This revision uses Jellyfin 12.0, Ubuntu Server, Docker Engine, and Docker Compose. It includes the Docker repository setup that the earlier version of this guide assumed, creates the service account before using it, makes the host/container path contract explicit, treats Docker port publishing honestly, and adds a complete backup-and-restore path before the upgrade section.
Revision provenance: the operational lessons in this guide come from real Jellyfin and homelab work. The September 2026 revision was checked against the current Jellyfin and Docker documentation. Version-specific commands and upgrade notes should still be rechecked before a future major upgrade.
It is a companion to The Definitive Guide to Building a Homelab from Scratch. That broader guide covers host, storage, network, trust-boundary, and recovery decisions. This guide chooses one concrete Jellyfin path and makes the points where you must deviate explicit.
For the reasoning behind choosing and continuing to operate the platform, start with Why I Self-Host Jellyfin.
Use media you are legally entitled to store and stream. Jellyfin organizes and serves files; it does not grant rights to copyrighted material or replace the rules that apply where you live.
What this guide builds
The reference deployment uses:
- Ubuntu Server 26.04 LTS or 24.04 LTS;
- Docker Engine and the Docker Compose plugin from Docker’s official
aptrepository; - the official
jellyfin/jellyfin:12.0image channel; - a dedicated host service identity named
media; /srv/compose/jellyfinfor the deployment definition;/srv/appdata/jellyfinfor persistent Jellyfin state;/srv/cache/jellyfinfor regenerable cache and transcodes;/srv/data/mediaas the shared host-side media root;/mediaas Jellyfin’s read-only container view of that library;- bridge networking with only the web port published by default;
- optional Intel, AMD, or NVIDIA hardware acceleration;
- a stopped-container configuration backup with a documented restore path;
- deliberate, reviewed image updates instead of unattended major upgrades.
The /srv/data/media host path is intentional. Later media-automation guides can use /srv/data as their shared root while Jellyfin receives only the finished library as /media:ro. That keeps the same host data tree across the series without giving Jellyfin write access to downloads or imports.
The example does not require Kubernetes, a hypervisor, a reverse proxy, shared storage, or a VPN. Those can be added for a specific reason after the local path works.
Before you begin
This guide assumes you have:
- an Ubuntu Server host you administer with
sudo; - a stable LAN address or DHCP reservation for that host;
- at least one media file you can legally use for testing;
- enough disk space for Jellyfin configuration, cache, and temporary transcodes;
- a way to copy backups to a second system or storage target.
If /srv/data/media will be an NFS or SMB mount, finish and validate that mount before you start Jellyfin. A remote filesystem is a real dependency, not just another directory.
The operating model
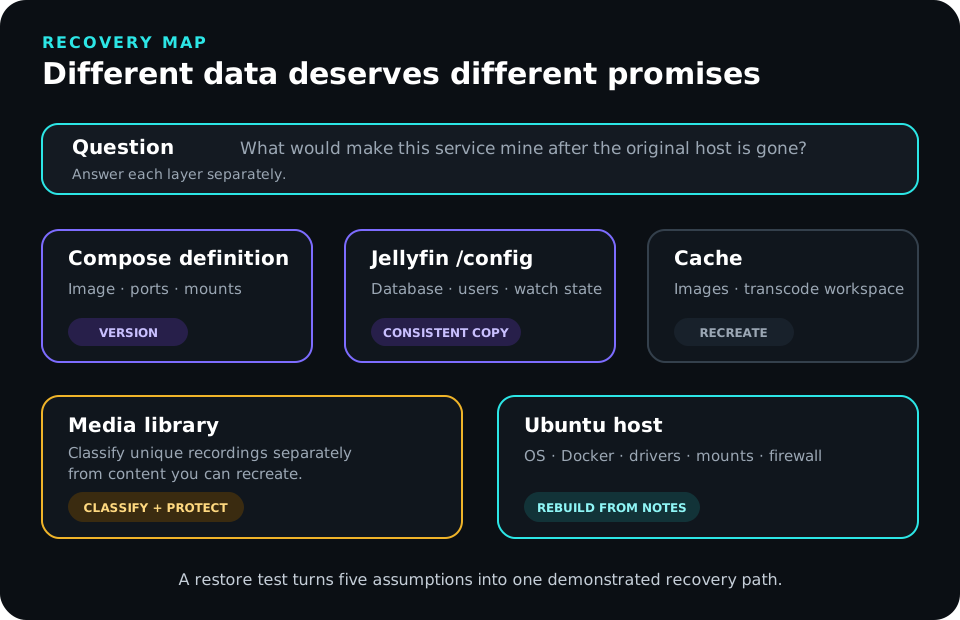
Before installing anything, separate the parts by what they do and how painful they are to replace.
| Layer | Responsibility | Recovery expectation |
|---|---|---|
| Ubuntu host | Kernel, drivers, Docker, mounts, firewall | Rebuild from notes or automation |
| Compose project | Image, ports, devices, volumes, restart policy | Restore from version control or backup |
| Jellyfin configuration | Database, users, metadata, settings, watch state | Back up and restore as one unit |
| Cache and transcodes | Temporary and regenerable data | Recreate after failure |
| Media library | Content Jellyfin presents | Protect according to replaceability |
| Clients | Playback capabilities and user experience | Reconfigure as needed |
The container should be replaceable. The deployment definition should be reproducible. Jellyfin’s configuration should be recoverable. The library should have a protection plan that matches how difficult it would be to replace.
Those are different promises. Do not collapse them into “Docker makes it portable.”
Decide what the server must support
Hardware recommendations mean little without a playback target. Write down the actual demand first.
Estimate:
- typical simultaneous local streams;
- typical simultaneous remote streams;
- maximum source resolution and bitrate;
- the weakest client you expect to support;
- whether subtitles are common;
- whether HDR-to-SDR tone mapping is required;
- available upload bandwidth for remote users.
A household may have ten profiles and only two simultaneous streams. Concurrent playback determines the useful network and transcoding budget much more than account count.
Prefer direct play
The cheapest Jellyfin session is one in which the client consumes the original file. Jellyfin calls this direct play.
If the container or audio format must change while the video can remain untouched, Jellyfin may remux or direct-stream the media. That is usually inexpensive.
When the client cannot handle the video codec, bitrate, subtitle mode, or another requirement, Jellyfin transcodes. The server decodes and re-encodes part or all of the stream. That is the expensive path.
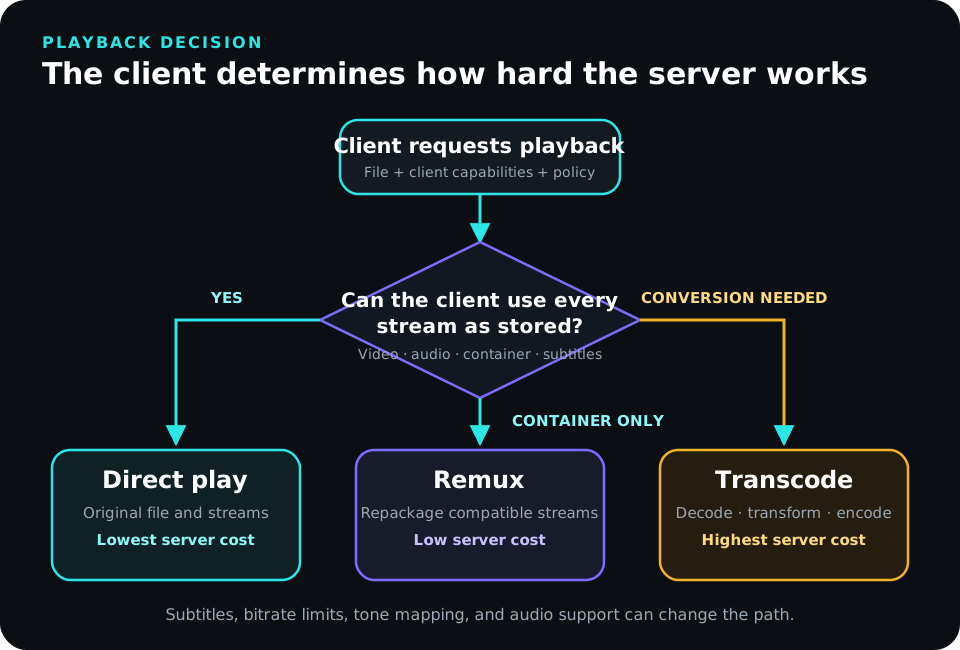
Test the least capable television, streaming stick, browser, or phone early. Better client compatibility can save more server capacity than a larger CPU.
Prepare Ubuntu Server
Confirm a supported release
As of this revision, Docker’s Ubuntu instructions list Ubuntu 26.04 LTS, 24.04 LTS, and 22.04 LTS as supported releases.
Check what you actually installed:
cat /etc/os-release
dpkg --print-architecture
uname -r
Update the host before adding Docker:
sudo apt update
sudo apt full-upgrade
If the update installed a new kernel, reboot and reconnect before continuing:
sudo rebootCheck time and DNS
timedatectl status
resolvectl status
Fix incorrect time synchronization or DNS before installing the application. Authentication, logs, certificates, scheduled jobs, and metadata providers all assume those foundations work.
Prepare the media path
Create the reference host tree:
sudo install -d -o root -g root -m 0755 /srv/data
sudo install -d -o root -g root -m 0755 /srv/data/media
sudo install -d -o root -g root -m 0755 /srv/data/media/movies
sudo install -d -o root -g root -m 0755 /srv/data/media/shows
If your media already exists somewhere else, do not move it merely to match this guide. Either mount it at /srv/data/media or change MEDIA_ROOT later and keep that choice consistent in the rest of the media series.
If media is a separate or remote mount
Do not use findmnt --target /srv/data/media as proof that /srv/data/media itself is mounted. findmnt --target can walk upward and report a parent filesystem.
Use mountpoint when this path is supposed to be a mount point:
mountpoint -q /srv/data/media
echo $?
Exit status 0 means that exact path is a mount point. A nonzero result means stop and fix the mount before starting Jellyfin.
Then prove that expected content is actually readable:
test -r /srv/data/media/movies && echo "movies path readable"
test -x /srv/data/media/shows && echo "shows path traversable"
If the media lives as ordinary directories on the host’s root filesystem, the mountpoint check is not expected to pass; use the read/traverse checks instead.
For NFS or SMB, make boot ordering explicit. Docker Compose does not know that an empty local directory is supposed to contain a remote filesystem. A container that starts before the mount is ready can see an empty library and may write state based on the wrong view of storage.
Install Docker from the official repository
The previous version of this guide showed only the final apt install line. That is not enough on a clean Ubuntu host because docker-ce comes from Docker’s repository, not stock Ubuntu.
First remove conflicting packages if they are installed:
sudo apt remove -y $(dpkg --get-selections docker.io docker-compose docker-compose-v2 docker-doc docker-buildx podman-docker containerd runc | cut -f1)It is fine if the command reports that none of those packages are installed.
Add Docker’s signing key and repository:
sudo apt update
sudo apt install -y ca-certificates curl
sudo install -m 0755 -d /etc/apt/keyrings
sudo curl -fsSL https://download.docker.com/linux/ubuntu/gpg -o /etc/apt/keyrings/docker.asc
sudo chmod a+r /etc/apt/keyrings/docker.asc

sudo tee /etc/apt/sources.list.d/docker.sources >/dev/null <<EOF
Types: deb
URIs: https://download.docker.com/linux/ubuntu
Suites: $(. /etc/os-release && echo "${UBUNTU_CODENAME:-$VERSION_CODENAME}")
Components: stable
Architectures: $(dpkg --print-architecture)
Signed-By: /etc/apt/keyrings/docker.asc
EOF

sudo apt update
Install Docker Engine and Compose:
sudo apt install -y docker-ce docker-ce-cli containerd.io docker-buildx-plugin docker-compose-pluginVerify the installation before proceeding:
sudo systemctl status docker --no-pager
sudo docker version
sudo docker compose version
sudo docker run --rm hello-world
Stop here if hello-world does not run successfully. Jellyfin will not make a broken Docker installation easier to diagnose.
Membership in the docker group effectively grants root-level control over the host. This guide keeps using sudo docker ... instead of silently granting that permission to a login account.
Create the Jellyfin service identity
The old guide used id media and sudo -u media without ever creating media. Create it now.
getent group media >/dev/null || sudo groupadd --system media
id media >/dev/null 2>&1 || sudo useradd \
  --system \
  --gid media \
  --home-dir /var/lib/jellyfin \
  --create-home \
  --shell /usr/sbin/nologin \
  media
Verify the account and record its numeric IDs:
id media
MEDIA_UID=$(id -u media)
MEDIA_GID=$(id -g media)
printf 'media uid=%s gid=%s\n' "$MEDIA_UID" "$MEDIA_GID"
The numeric values can differ from another host. That is normal. If /srv/data/media is on NFS or another system that enforces numeric ownership, align the IDs deliberately across systems instead of changing permissions until the symptom disappears.
Create a predictable directory layout
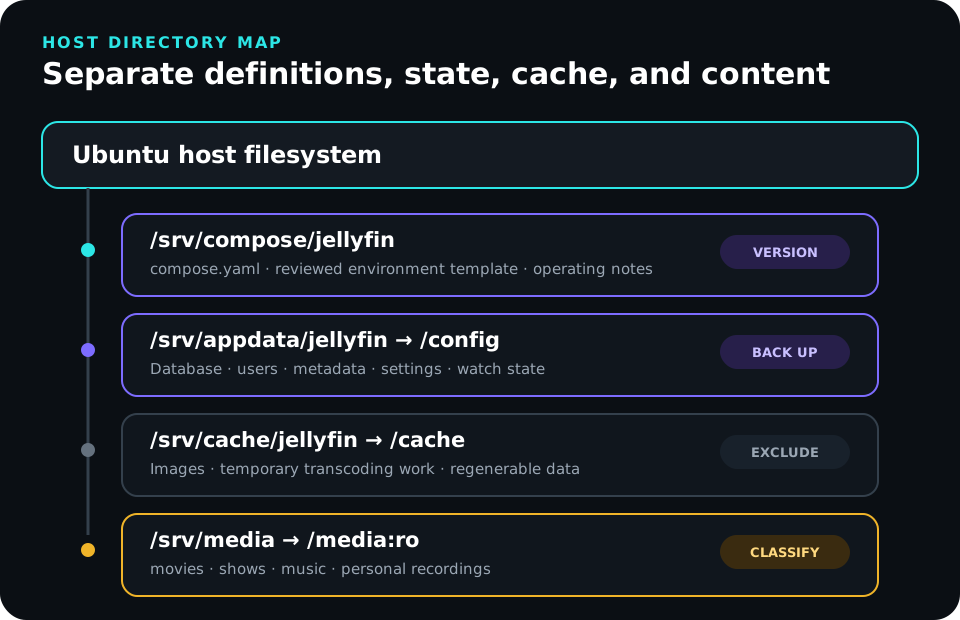
The reference layout is:
| Host path | Container path | Purpose | Backup class |
|---|---|---|---|
/srv/compose/jellyfin | — | Compose and environment files | Versioned/backed up |
/srv/appdata/jellyfin | /config | Database, users, settings, metadata | Required |
/srv/cache/jellyfin | /cache | Cache and transcodes | Regenerable |
/srv/data/media | /media | Finished media libraries | Policy-based; read-only to Jellyfin |
Create the application directories. The Compose directory is root-owned but traversable so an administrator can cd into it; the .env file itself remains root-only:
sudo install -d -o root -g root -m 0755 /srv/compose/jellyfin
sudo install -d -o media -g media -m 0750 /srv/appdata/jellyfin
sudo install -d -o media -g media -m 0750 /srv/cache/jellyfin
Do not recursively chown an existing media library just because Jellyfin cannot read it. First inspect its owner, group, ACLs, and any NFS/SMB mapping.
Test the service account against a real file before involving Docker:
sudo -u media find /srv/data/media -maxdepth 3 -type f -print -quitIf that prints a file, test that exact path with test -r. If it prints nothing and you know media exists, fix the host-side permissions first.
Build the Compose project
Generate an environment file using the service account’s actual IDs:
MEDIA_UID=$(id -u media)
MEDIA_GID=$(id -g media)

sudo tee /srv/compose/jellyfin/.env >/dev/null <<EOF
JELLYFIN_IMAGE=jellyfin/jellyfin:12.0
PUID=$MEDIA_UID
PGID=$MEDIA_GID
TZ=Etc/UTC
CONFIG_ROOT=/srv/appdata
CACHE_ROOT=/srv/cache
MEDIA_ROOT=/srv/data/media
JELLYFIN_BIND_ADDRESS=0.0.0.0
EOF

sudo chown root:root /srv/compose/jellyfin/.env
sudo chmod 0600 /srv/compose/jellyfin/.env
Change TZ to your preferred IANA time zone if you want Jellyfin’s local timestamps to match the host’s location.
JELLYFIN_BIND_ADDRESS=0.0.0.0 makes the published port listen on every host interface. That is convenient on a single trusted LAN, but it is not a security boundary. If this host has multiple interfaces or can be reached from networks that should not see Jellyfin, replace 0.0.0.0 with the trusted LAN interface address and enforce the intended source networks at the router/VLAN/firewall boundary.
Open the root-owned Compose file with elevated editing permissions:
sudoedit /srv/compose/jellyfin/compose.yamlPaste this configuration and save the file:
services:
  jellyfin:
    image: ${JELLYFIN_IMAGE}
    container_name: jellyfin
    user: "${PUID}:${PGID}"
    environment:
      TZ: ${TZ}
    volumes:
      - ${CONFIG_ROOT}/jellyfin:/config
      - ${CACHE_ROOT}/jellyfin:/cache
      - ${MEDIA_ROOT}:/media:ro
    ports:
      - "${JELLYFIN_BIND_ADDRESS}:8096:8096/tcp"
    restart: unless-stopped
    security_opt:
      - no-new-privileges:true
The baseline intentionally does not publish UDP 7359. Add 7359:7359/udp only if you need Jellyfin’s local client discovery. DLNA is a separate case; Jellyfin’s documentation notes that it requires host networking, which changes the network boundary substantially.
Understand Docker and UFW before relying on it
Docker’s official Ubuntu documentation warns that published container ports can bypass ordinary UFW/firewalld rules because Docker diverts the traffic before the chains those tools normally manage.
That means this is not a safe statement:
“I denied 8096 in UFW, therefore the Docker-published 8096 port is private.”
Treat the Compose bind address, upstream router/VLAN ACLs, and Docker-aware firewall policy as the controls for published ports. If you implement host-level filtering for Docker, follow Docker’s current packet-filtering documentation rather than adding a generic UFW rule copied from an unrelated host.
Validate before first start
cd /srv/compose/jellyfin
sudo docker compose config --quiet
sudo docker compose pull jellyfin
sudo docker compose up -d jellyfin
sudo docker compose ps
sudo docker compose logs --tail=100 jellyfin
You should see the container running without repeated permission or database errors.
Confirm that the host is listening on the intended address:
sudo ss -lntp | grep ':8096'Then open this from a trusted client on the same allowed network:
http://SERVER_ADDRESS:8096If the page does not load, stop here and use the troubleshooting section before adding libraries, acceleration, or remote access.
Complete the initial setup deliberately
Create a dedicated administrator
Use a unique administrative account and a strong password. Do not make every household user an administrator. Create normal user profiles after setup and grant only the libraries and features each profile needs.
Add one small library first
Start with a representative directory, not the entire collection.
Container paths in this guide are:
/media/movies
/media/shows
/media/music
/media/home-videos
Add one library and verify:
- the path is visible in the wizard;
- items scan successfully;
- artwork and naming look sensible;
- a file plays;
- the dashboard reports whether it direct-plays, remuxes, or transcodes.
Only then add the rest of the collection.
Keep plugins conservative
Jellyfin 12.0 changed the database and plugin compatibility boundary. Start with the default server. Add a plugin only when it solves a specific problem and has a known 12.0-compatible release.
Back up /config before installing or upgrading third-party plugins.
Configure Intel or AMD hardware acceleration
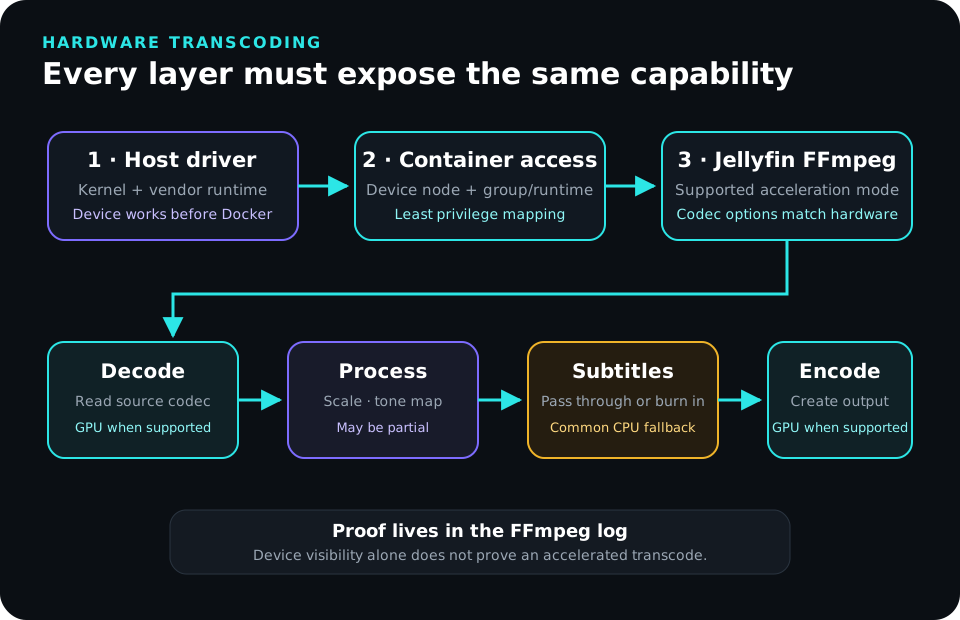
Hardware acceleration is optional. If your clients direct-play almost everything, do not complicate the server merely because a GPU exists.
Identify the GPU and render device:
lspci -nn | grep -Ei 'vga|display|3d'
ls -l /dev/dri
getent group render
getent group video
The render device is often /dev/dri/renderD128, but verify it on the actual host.
Get the numeric render-group ID:
RENDER_GID=$(getent group render | cut -d: -f3)
echo "$RENDER_GID"
Edit the root-owned Compose file:
sudoedit /srv/compose/jellyfin/compose.yamlAdd the device and supplemental group under the jellyfin service:
    devices:
      - /dev/dri:/dev/dri
    group_add:
      - "RENDER_GROUP_ID"
Replace RENDER_GROUP_ID with the number printed above. For example, if getent group render prints render:x:109:, use:
    group_add:
      - "109"
After editing Compose, recreate the container so the new device/group settings actually take effect:
cd /srv/compose/jellyfin
sudo docker compose config --quiet
sudo docker compose up -d --force-recreate jellyfin
sudo docker compose exec jellyfin ls -l /dev/dri
Then select the appropriate QSV or VA-API mode in Jellyfin’s playback/transcoding settings and enable only the codec paths your hardware supports.
Prove acceleration with an actual transcode
Force a playback case that cannot direct-play, then inspect Jellyfin’s dashboard and FFmpeg log.
Verify:
- the session is genuinely transcoding;
- the expected hardware decoder/encoder appears in the log;
- transcode speed stays comfortably above real time;
- CPU use reflects hardware offload;
- subtitles still work;
- HDR tone mapping works if you need it.
A device node existing inside the container proves only that the device is visible. It does not prove Jellyfin is using it successfully.
NVIDIA hardware acceleration
NVIDIA adds a host-driver and container-toolkit dependency, so keep it separate from the baseline.
Before touching Compose:
- install a Jellyfin-supported NVIDIA driver;
- confirm
nvidia-smiworks on the host; - install the current NVIDIA Container Toolkit using NVIDIA’s documentation;
- prove a simple GPU-enabled container can see the device;
- then follow Jellyfin’s current NVIDIA acceleration instructions.
Do not copy an old runtime: nvidia stanza from a random forum post and assume it matches the current toolkit.
Design the library layout
Predictable files reduce metadata and matching problems.
Movies
/media/movies/Movie Title (2024)/Movie Title (2024).mkvShows
/media/shows/Show Title (2023)/Season 01/Show Title (2023) - S01E01.mkvMusic
/media/music/Artist/Album (2022)/01 - Track Title.flacKeep temporary downloads and extraction directories outside the library. Jellyfin should consume completed, organized media.
The companion *arr guide will use /srv/data as the host-side shared root so download/import services can see both downloads and finished media under one filesystem while Jellyfin continues receiving only /srv/data/media read-only.
Secure the service
A media server contains user accounts, viewing history, library metadata, and a map of files on storage. Treat it like an application, not an appliance that becomes safe because it is at home.
Keep administration private
For a LAN-only deployment:
- publish only the ports you need;
- bind them only to the intended host interface when possible;
- prevent untrusted VLANs from reaching the service at the network boundary;
- do not publish Docker’s API;
- do not mount
/var/run/docker.sockinto Jellyfin; - keep
/mediaread-only; - keep normal household accounts separate from the administrator account.
Choose one remote-access model
| Model | Strength | Tradeoff |
|---|---|---|
| Private VPN or overlay | Small public surface; strong device identity | Every remote client needs support/enrollment |
| Reverse proxy with TLS | Familiar URL; broad client compatibility | Public application surface needs active maintenance |
| No remote access | Simplest boundary | Playback stays local |
A reverse proxy terminates TLS and routes traffic. It does not make an unpatched Jellyfin instance safe and it does not replace authentication.
If you expose Jellyfin remotely, test the complete path with a real stream, not just the login page.
Back up what makes the server unique
For a container deployment, /config is the critical Jellyfin state. Jellyfin’s own backup guidance is explicit that there is no general downgrade mechanism after database migrations: restoring a pre-upgrade backup is how you return to the previous state.
Create a protected staging directory:
sudo install -d -o root -g root -m 0700 /srv/backups/jellyfinTake a consistent manual backup
Stop Jellyfin before copying its state:
cd /srv/compose/jellyfin
STAMP=$(date +%Y%m%d-%H%M%S)

sudo docker compose stop jellyfin
sudo tar --xattrs --acls \
  -C /srv/appdata \
  -czf "/srv/backups/jellyfin/jellyfin-config-${STAMP}.tar.gz" \
  jellyfin
sudo docker compose start jellyfin
Verify that the archive can be listed:
sudo tar -tzf "/srv/backups/jellyfin/jellyfin-config-${STAMP}.tar.gz" | headThe file under /srv/backups is still only a staging copy if it lives on the same storage as /srv/appdata. Copy it to an independent destination and apply retention there.
Do not back up /srv/cache/jellyfin unless you have a specific reason. Cache and transcodes are designed to be regenerated.
Restore from the backup
A restore is not “put the tarball somewhere and hope Jellyfin finds it.” Test the procedure.
On an isolated test host or after intentionally stopping production:
cd /srv/compose/jellyfin
sudo docker compose stop jellyfin

sudo mv /srv/appdata/jellyfin /srv/appdata/jellyfin.before-restore
sudo install -d -o media -g media -m 0750 /srv/appdata/jellyfin

sudo tar --xattrs --acls \
  -C /srv/appdata \
  -xzf /path/to/jellyfin-config-BACKUP_TIMESTAMP.tar.gz

sudo chown -R media:media /srv/appdata/jellyfin
sudo docker compose start jellyfin
sudo docker compose logs --tail=200 jellyfin
Then prove the restore:
- sign in with the expected account;
- confirm libraries and users exist;
- check watch state;
- play a representative file;
- force a transcode if hardware acceleration is part of the service;
- record what failed or required manual intervention.
Keep the jellyfin.before-restore directory until the restore is validated, then remove it deliberately.
Upgrading from Jellyfin 10.11 to 12.0
Jellyfin 12.0 was released in September 2026 and is not a routine patch update. Its first boot performs database migrations that prevent a simple image-only rollback.
Before upgrading an existing 10.11 deployment:
- Confirm the server is on 10.10.7 or a 10.11.x release. Direct upgrades from 10.11.x to 12.0 are supported.
- Stop Jellyfin and take a full manual backup of the data/config directory.
- Check for usernames that differ only by capitalization; 12.0 makes usernames case-insensitive and that collision can break migration.
- Remove third-party plugins before the upgrade and reinstall only versions confirmed compatible with 12.0.
- Record the current image tag/digest and the backup identifier.
For this guide’s Compose layout, change:
JELLYFIN_IMAGE=jellyfin/jellyfin:10.11to:
JELLYFIN_IMAGE=jellyfin/jellyfin:12.0Then:
cd /srv/compose/jellyfin
sudo docker compose config --quiet
sudo docker compose pull jellyfin
sudo docker compose up -d jellyfin
sudo docker compose logs -f jellyfin
The initial 12.0 migration can take several minutes on a large library. Do not interrupt it simply because startup is slower than normal.
After the server is healthy:
- perform the required full library scan;
- expect the first scan to take longer than usual;
- hard-refresh or clear the browser cache if the web UI behaves strangely;
- test login, browsing, direct play, subtitles, and a forced transcode;
- test at least one remote client if remote access is part of the service.
If the upgrade must be rolled back, stop 12.0, restore the pre-upgrade /config backup, and run the matching previous image. Replacing only the image is not a safe rollback after the database has migrated.
Future update procedure
The 12.0 image tag follows stable patch releases inside the 12.0 line. Do not treat that as permission for unattended pulls.
Before any update:
cd /srv/compose/jellyfin
sudo docker compose images
sudo docker inspect jellyfin --format '{{.Image}}'
sudo docker compose ps
Read the release notes, take a verified backup, then:
sudo docker compose config --quiet
sudo docker compose pull jellyfin
sudo docker compose up -d jellyfin
sudo docker compose logs --tail=200 jellyfin
Validate the user path afterward.
Monitor the user path
Container status is necessary but insufficient.
Monitor at least:
- host reachability and time synchronization;
- free space and inodes for configuration, cache, and media;
- remote media mount presence if applicable;
- container state and restart count;
- HTTP response from Jellyfin;
- recent backup completion and restore-test date;
- GPU visibility and transcode failures;
- certificate expiration if a proxy terminates TLS.
Useful checks include:
df -h /srv/appdata /srv/cache /srv/data/media
df -i /srv/appdata /srv/cache /srv/data/media
sudo docker stats --no-stream jellyfin
sudo docker inspect jellyfin --format '{{.RestartCount}}'
An HTTP monitor proves that an HTTP response exists. It does not prove that a movie plays. Periodically perform a real playback test.
Troubleshoot in dependency order
The interface does not load
Check in this order:
cd /srv/compose/jellyfin
sudo docker compose ps
sudo docker compose logs --tail=200 jellyfin
sudo ss -lntp | grep ':8096'
curl -I http://127.0.0.1:8096 || true
If JELLYFIN_BIND_ADDRESS is not 0.0.0.0 or 127.0.0.1, test the configured address instead of assuming loopback will be published.
Then ask:
- Is the container running?
- Do logs show a permission or database error?
- Is 8096 listening on the intended host address?
- Can another device on the allowed LAN reach that address?
- Is a router/VLAN rule blocking the path?
- If proxied, can the proxy reach the origin?
The library is empty
If /srv/data/media is supposed to be a mount point:
mountpoint /srv/data/mediaThen inspect the same data at each layer:
sudo -u media ls -la /srv/data/media
sudo docker compose exec jellyfin ls -la /media
If the host service account cannot see files, fix the host/mount permissions. If the host can see files but the container cannot, inspect the resolved mounts:
sudo docker compose configIf the container sees files but Jellyfin does not, check the library path configured in Jellyfin and the scan log.
Files appear but will not play
Determine whether the session attempts direct play, remux, or transcode. Then inspect the FFmpeg log.
Common causes include:
- the container can list a file but cannot read it;
- the client cannot handle the video, audio, subtitles, or bitrate;
- the transcode directory is full or unwritable;
- the GPU device or driver is missing;
- a proxy or client times out;
- the network cannot sustain the bitrate.
Hardware acceleration is selected but unused
Verify each layer:
- the host driver recognizes the device;
/dev/drior the NVIDIA device exists;- the container receives the device;
- the container identity has the required supplemental group;
- Jellyfin uses the matching acceleration mode;
- the test file actually requires a supported transcode path;
- the FFmpeg log names the expected hardware implementation.
Do not enable every codec checkbox and hope.
Local playback works but remote playback buffers
Measure upload capacity, proxy/VPN throughput, remote bitrate limits, and whether the remote client forces transcoding. Test a low-bitrate and a high-bitrate file separately.
If a low-bitrate file works, basic reachability is probably not the core problem.
Common mistakes
Starting with the entire library
Why it hurts: a naming, permission, or metadata mistake spreads across thousands of items.
Better: validate one representative directory and one playback path first.
Mounting media read-write without a reason
Why it hurts: Jellyfin receives authority it does not need.
Better: mount the finished library read-only and let the system responsible for organization own writes.
Treating UFW as proof a Docker port is blocked
Why it hurts: Docker-published traffic can bypass the normal UFW path.
Better: bind deliberately and enforce Docker-aware or upstream network policy.
Assuming a visible GPU means acceleration works
Why it hurts: codec support, tone mapping, subtitles, drivers, permissions, and Jellyfin settings still matter.
Better: force a representative transcode and read the FFmpeg log.
Backing up only Compose
Why it hurts: Compose recreates the container, not users, watch state, metadata, or the database.
Better: preserve the deployment definition and a consistent copy of /config.
Updating without a restore point
Why it hurts: Jellyfin database migrations can make the old image incompatible with the new state.
Better: stop, back up, verify, update, validate, and know exactly which backup and image restore the old state.
Final validation checklist
Host and Docker
- Ubuntu release is supported and patched.
- Time and DNS are correct.
- Docker was installed from the intended repository.
-
sudo docker run --rm hello-worldsucceeds. -
docker compose config --quietsucceeds.
Identity and storage
- The
mediaservice account exists. -
/srv/appdata/jellyfinand/srv/cache/jellyfinare writable by that account. -
/srv/data/mediais readable by that account. - A remote media path is proven mounted with
mountpointbefore startup. - Jellyfin receives the media library read-only.
Application
- Jellyfin reports the expected 12.0 release.
- Administrator and normal-user roles are separated.
- A small library was validated before the full scan.
- A representative file direct-plays or transcodes as expected.
- Hardware acceleration is proven in the FFmpeg log if enabled.
Network and recovery
- Port 8096 listens only where intended.
- The network boundary allows only the intended clients.
- Docker/UFW behavior is understood rather than assumed.
- A configuration backup has been created and copied off the source storage.
- A restore has been tested in isolation.
- The update and rollback procedure is written down.
Where the *arr stack fits
Jellyfin should consume an organized library. It should not manage download queues, indexers, request approval, renaming, or import workflows.
The automation layer can use /srv/data as a shared host filesystem so download clients and import services can see both downloads and finished media consistently. Jellyfin stays simpler: it receives only /srv/data/media as /media:ro.
Continue to The Definitive Guide to the *arr Stack on Ubuntu with Docker.
Final perspective
A reliable Jellyfin server is not defined by the number of libraries on its home screen. It is defined by whether you understand the path from client to file.
The client must reach the service. The service must reach its database and media. The container identity must have the correct permissions. The network must carry the bitrate. The client must support the stream or the server must transform it. The backup must preserve what cannot be recreated.
Docker makes those boundaries visible. It does not make the decisions for you.
Start with one host, one small library, one tested client, and one verified backup. Prove the simple path. Add acceleration, remote access, plugins, shared storage, and automation only when the current system is understood.
References and further reading
- Jellyfin 12.0 release notes
- Jellyfin container installation
- Jellyfin backup and restore
- Jellyfin hardware acceleration
- Jellyfin Intel hardware acceleration
- Jellyfin AMD hardware acceleration
- Jellyfin NVIDIA hardware acceleration
- Docker Engine installation on Ubuntu
- Docker packet filtering and firewalls
- Docker port publishing
- Docker Compose file reference
AI transparency
AI assisted with research, technical cross-checking, structure, editing, and sanitized configuration examples. The operational lessons—storage dependencies, container boundaries, client differences, metadata problems, remote playback, hardware acceleration, and recovery planning—are grounded in real Jellyfin and homelab work. The September 13, 2026 revision was checked against current Jellyfin 12.0 and Docker documentation; future readers should recheck version-sensitive instructions against upstream documentation before a major upgrade.