A homelab can begin with almost anything: an old desktop, a used mini PC, a workstation with too much memory, a purpose-built storage server, or a single-board computer on a shelf.
The hardware matters, but it is not what makes the environment useful. A homelab becomes valuable when you can explain what it does, where its data lives, what depends on what, what is exposed, how you know it is healthy, and how you recover when something important fails.
That is the version of homelabbing this handbook is about.
This is an architecture and operations handbook, not a paste-every-command installation tutorial. It is meant to help you make the decisions that come before deployment and to show the order in which those decisions become a reliable system. When this site has a tested implementation guide for a specific service, this handbook links to it instead of duplicating a second, weaker walkthrough here.
The goal is not to reproduce my exact hardware or application list. By the end, you should be able to choose a sensible architecture, select hardware from workload requirements, design storage and networking, choose a host platform, decide how services are exposed, build monitoring and backups into the design, and define a recovery path before the lab becomes household infrastructure.
I use a sanitized version of my own environment as one example: an application host, a separate storage/worker host, managed routing and wireless, several trust zones, Docker for much of the application layer, and shared storage across the two hosts. That arrangement grew over time, so it contains both decisions I would repeat and complexity I would introduce later if I were starting again.
What this handbook is — and what it is not
This article is best used as a roadmap and reference.
It will help you answer questions such as:
- What should I build first?
- Do I need one host or several?
- Should storage be local or separate?
- When does a VLAN solve a real problem?
- Which services should be public, private, or LAN-only?
- Where should persistent data live?
- What should be backed up?
- How do I keep the lab understandable after six months of changes?
- What must be tested before I trust a service?
It does not promise that every command applies unchanged to every distribution, hypervisor, router, NAS, filesystem, or application. Hardware names, package versions, interfaces, mount paths, image tags, permissions, and product UIs change.
When you need a literal implementation path, use the dedicated guide for that layer. On this site, the currently remediated examples are:
- The Definitive Guide to Jellyfin on Ubuntu with Docker for a complete playback-service deployment;
- The *arr Stack on Ubuntu with Docker: Architecture & Reference Guide for the media-automation design contract;
- Build Your *arr Stack: A Step-by-Step Docker Media Automation Guide for the literal automation-stack build;
- The Definitive Guide to Tailscale for Homelabs for private remote administration and routed access.
Those guides are implementation leaves on the architecture tree described here.
Who this handbook is for
This is written for someone who has moved beyond “install this container in five minutes” and wants to understand the surrounding system.
You might be completely new to self-hosting. You might already run Jellyfin, Home Assistant, a game server, or a few Docker containers and want to make the environment less fragile. You might work in IT and want a place to practice Linux, networking, virtualization, storage, automation, and recovery without touching a production environment.
You do not need enterprise hardware, a rack, ZFS, Kubernetes, or multiple servers.
You should be willing to:
- read a command before running it;
- check current documentation for the specific platform you choose;
- keep private infrastructure details out of public notes;
- make one change at a time when troubleshooting;
- test recovery rather than assuming a backup is good;
- accept that the simplest architecture that meets the goal is often the best first architecture.
A small glossary before the architecture
A few terms appear throughout the rest of the handbook.
| Term | Meaning in this handbook |
|---|---|
| Host | A physical or virtual machine that runs workloads |
| Service | An application or infrastructure function users or other systems depend on |
| Control plane | Configuration and management state that tells the system what to do |
| Data plane | The actual traffic, files, streams, or requests the system carries |
| Persistent data | State that must survive recreation of a VM or container |
| Failure domain | A set of components likely to fail together |
| Dependency | Something that must work before another component can work |
| RPO | How much recent data loss you are willing to tolerate after recovery |
| RTO | How long you are willing to wait for a service to return |
| VLAN | A Layer 2 network segment; it becomes a security boundary only when routing/firewall policy enforces one |
| Reverse proxy | A service that accepts a client connection and forwards it to an internal application |
| Overlay network | A logical private network built on top of another network, such as Tailscale |
| Snapshot | A point-in-time filesystem/storage state; useful for rollback but not automatically an independent backup |
You do not need to memorize the acronyms. The point is to keep availability, security, and recovery discussions precise.
The principles that should survive every redesign
Hardware and software will change. These principles are more durable.
Start with a problem, not a platform
“I want to learn Docker” is a motivation. “I want to run a private status page and understand how its state persists” is a project.
A useful project creates feedback. If you misunderstand storage, permissions, DNS, routing, or backups, the result becomes visible and teachable.
Prefer the smallest architecture that meets the goal
Clusters, distributed storage, high availability, Kubernetes, and multi-gigabit networking are all valid learning goals. None is a prerequisite for a useful homelab.
Every additional node adds relationships: membership, time, name resolution, storage placement, network paths, certificates, update order, and failure behavior.
For a first build, one reliable host with an independent backup destination is a strong architecture.
Keep replaceable compute separate from irreplaceable state
A container can be recreated. A family photo library, encryption key, database, or carefully built application configuration may not be.
Know which directories and databases make a service unique. Put deployment definitions somewhere versioned. Back up important state independently of the host that consumes it.
Make dependencies visible
If an application depends on NFS, DNS, a reverse proxy, a database, or a specific GPU device, write that down.
Invisible dependencies create the longest troubleshooting sessions because the visible failure appears far away from the actual cause.
Design recovery before convenience
Before trusting a service, answer:
- What state makes this service unique?
- Where is that state copied independently?
- Which credentials or keys are required to restore it?
- What must exist before the restore can begin?
- Have I restored it in a test environment?
Until the last answer is yes, you have a recovery theory.
Document decisions, not only commands
A shell history records what happened. It rarely explains why.
Record why a VLAN exists, why a dataset is separate, why a service has an unusual mount, why an update is pinned, and why a port is reachable from one network but not another.
Stage 1: Write the design brief
The fastest route to an expensive, confusing homelab is buying hardware before defining the workload.
Start with a one-page design brief.
List the next three months of workloads
Be specific. A reasonable first list might include:
- one Linux environment for administration practice;
- one monitoring service;
- one persistent web application;
- Jellyfin for local media playback;
- Home Assistant;
- one game server;
- a disposable Docker test environment.
Separate must have, would like, and later. If the must-have list contains twenty services, cut it again.
Mark special requirements
Identify workloads that need:
- substantial memory;
- high single-thread CPU performance;
- hardware video transcoding;
- a GPU, USB radio, serial adapter, or other direct device;
- low-latency local storage;
- large bulk storage;
- multicast/broadcast discovery;
- inbound access from outside the home;
- a specific operating system;
- continuous availability.
Do not buy every capability “just in case.” Buy for known requirements and reasonable headroom.
Classify impact
| Impact | Meaning | Example response |
|---|---|---|
| Experimental | Delete/rebuild without concern | Recreate when convenient |
| Personal | Outage is annoying | Repair within a day or two |
| Household | Other people depend on it | Communicate and restore promptly |
| Critical | Loss could lock you out or destroy unique data | Multiple copies, documented keys, tested recovery |
The label only needs to be consistent enough to drive backup and maintenance choices.
Record physical constraints
Measure the actual space. Consider ventilation, noise, heat, outlets, circuit capacity, wired network access, pets, dust, and whether you can run cable.
A quiet mini PC that stays online is often more useful than an inexpensive rack server you eventually shut down because it is loud and hot.
Stage 2: Budget for operation, not only purchase price
Total cost includes drives, memory, network equipment, cables, spare parts, backup media, a UPS, electricity, and your time.
Use measured wall power when possible rather than a power-supply label.
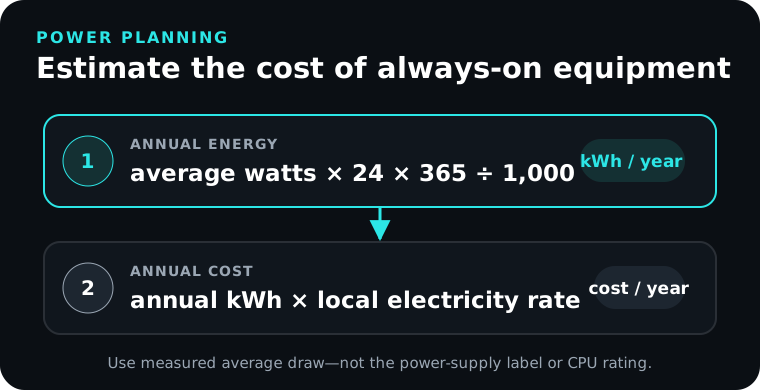
A simple estimate is:
annual kWh = average watts × 24 × 365 ÷ 1000
annual cost = annual kWh × your electricity rate
Almost all of that electrical energy eventually becomes heat in the room, so power budgeting is also cooling budgeting.
Reserve money across the system rather than spending everything on compute:
| Layer | Examples |
|---|---|
| Compute | CPU, memory, boot SSD, GPU when required |
| Storage | Data drives, HBA, cables, spare drive, backup target |
| Network | Switch, NICs, access points, patch cables |
| Protection | UPS, surge protection, shutdown integration |
| Operations | Replacement fans, adapters, power, subscriptions if used |
Stage 3: Choose the architecture before the hardware
Most early homelabs fit three useful shapes.
One host does everything
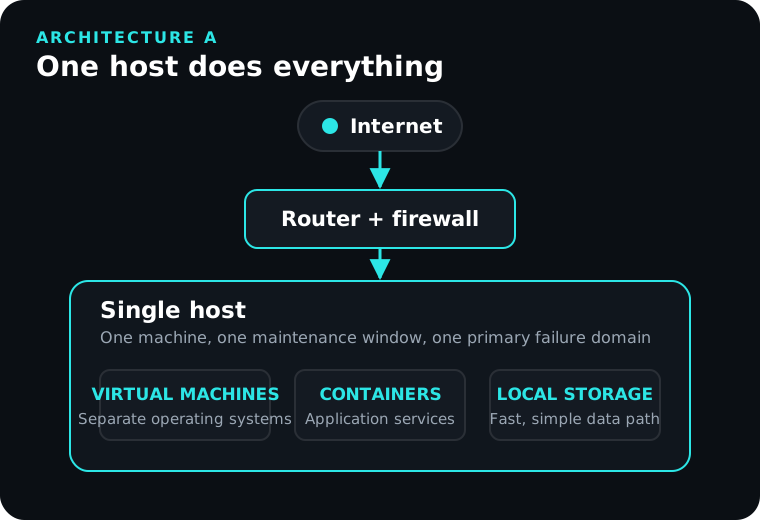
This is the strongest default for many first builds.
Advantages:
- one machine to patch and understand;
- fewer network dependencies;
- simple local storage;
- lower power and noise;
- easier backups and troubleshooting.
Tradeoffs:
- maintenance affects everything;
- one hardware failure affects everything;
- experiments share a failure domain with stable services.
You reduce those risks with good backups, conservative changes to household services, and a clearly disposable test environment.
Application host plus storage host
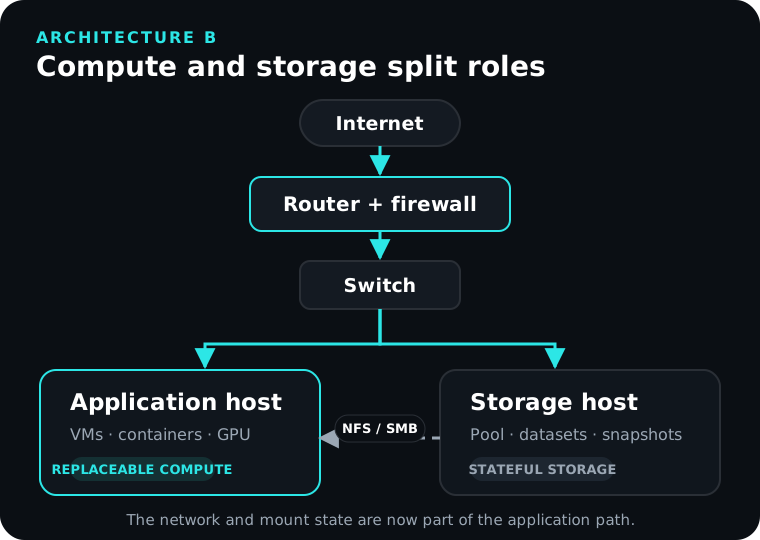
This separates compute from bulk storage.
Advantages:
- storage has its own disk topology and lifecycle;
- compute can change without moving the drives;
- each host can be sized for its role;
- the storage machine can expose purpose-built datasets.
Tradeoffs:
- applications now depend on the network and remote mount;
- identity and permissions cross machines;
- startup order matters;
- a healthy container does not prove its storage is present;
- two machines are still not automatically two independent backups.
Choose this when storage requirements justify it or network storage is itself a learning goal.
Virtualization cluster
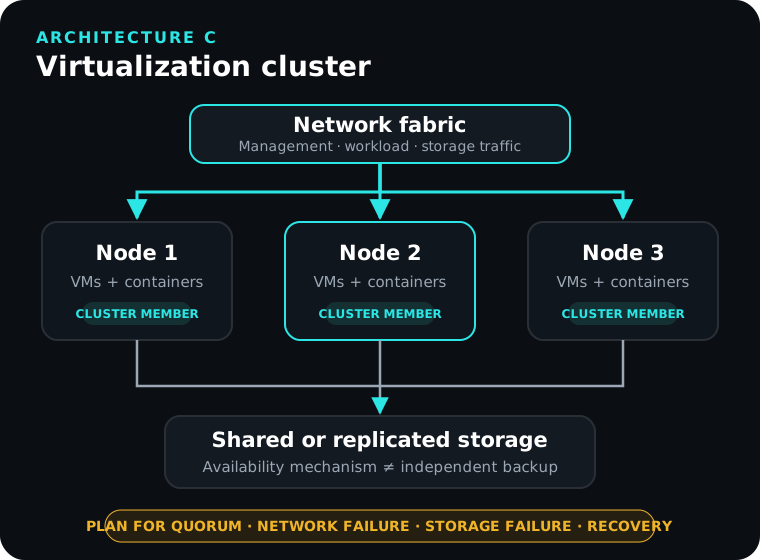
A cluster is appropriate when cluster behavior is part of the objective or a real availability requirement justifies it.
It adds quorum, shared state, failure placement, storage consistency, fencing, migration, and a more complicated recovery model. It can improve availability while simultaneously making recovery harder if you do not understand the failure modes.
High availability does not replace backups.
Stage 4: Select hardware from the workload
Once the architecture and workloads are known, hardware becomes a constraint-matching problem.
Reused desktop
Often the best first server. Check:
- virtualization support if needed;
- memory capacity and free slots;
- storage interfaces and physical drive space;
- idle power;
- NIC support;
- firmware behavior after power loss;
- thermals under sustained use.
A modest RAM or SSD upgrade can be sensible. A tower held together by adapters and proprietary compromises may not be.
Mini PC
Excellent for compute-heavy, storage-light services. Typical strengths are size, noise, idle power, and modern integrated graphics. Typical constraints are drive bays, PCIe expansion, NIC count, and repairability.
Used enterprise server
Excellent when memory, drive bays, remote management, and expansion are the actual requirement. Account for rack depth, noise, idle power, proprietary parts, old controllers, and the possibility that the cheapest purchase becomes the most expensive machine to run.
Storage-first host
When storage is the main requirement, prioritize drive connectivity, airflow, ECC where your chosen design benefits from it, controller behavior, physical serviceability, and a topology you understand.
Do not buy a CPU benchmark and then discover the chassis cannot safely hold the disks.
Stage 5: Treat power and physical layout as infrastructure
Before applications exist, establish:
- safe electrical loading;
- airflow and temperature expectations;
- a UPS strategy for systems that should shut down cleanly;
- cable labeling;
- physical drive/bay mapping;
- a restart order after an outage.
A UPS does not create infinite runtime. Decide whether it is buying enough time for short outages, graceful shutdown, or continued operation of a few critical network devices.
Test the shutdown path while everything is healthy.
Stage 6: Design storage around data classes
Storage decisions should start with what the data means, not with a RAID acronym.
| Data class | Examples | Primary concern |
|---|---|---|
| Replaceable bulk | Media, installers, caches | Capacity and convenience |
| Rebuildable application data | Generated thumbnails, temporary artifacts | Documented recreation |
| Configuration | Compose files, firewall exports, service settings | Versioning and backup |
| Active databases | Application state, automation history | Consistency and frequent backup |
| Personal data | Documents, photos, creative work | Multiple independent copies |
| Recovery secrets | Keys, tokens, backup credentials | Secure offline recovery |
Redundancy, snapshots, and backups are different
- Redundancy can keep data available after some hardware failures.
- Snapshots preserve earlier states for local rollback.
- Backups create independent recoverable copies.
- Replication copies data or snapshots elsewhere.
- Archival preserves selected data under longer retention rules.
A mirror does not protect against deletion, ransomware, fire, theft, or a bad administrative command. A snapshot on the same host does not survive loss of that host.
Choose a storage system you can operate
A single disk plus a good independent backup can be more recoverable than a complicated array with no tested restore.
ZFS can be an excellent option when its integrity, snapshots, datasets, and topology fit your requirements. Its vdev layout is one of the decisions that is hardest to change later, so use the current OpenZFS documentation for the platform and topology you actually choose rather than copying a pool-creation command from a blog post.
Useful concepts to understand before committing data are pools, vdevs, datasets, snapshots, scrubs, redundancy, and expansion behavior.
Separate datasets by purpose
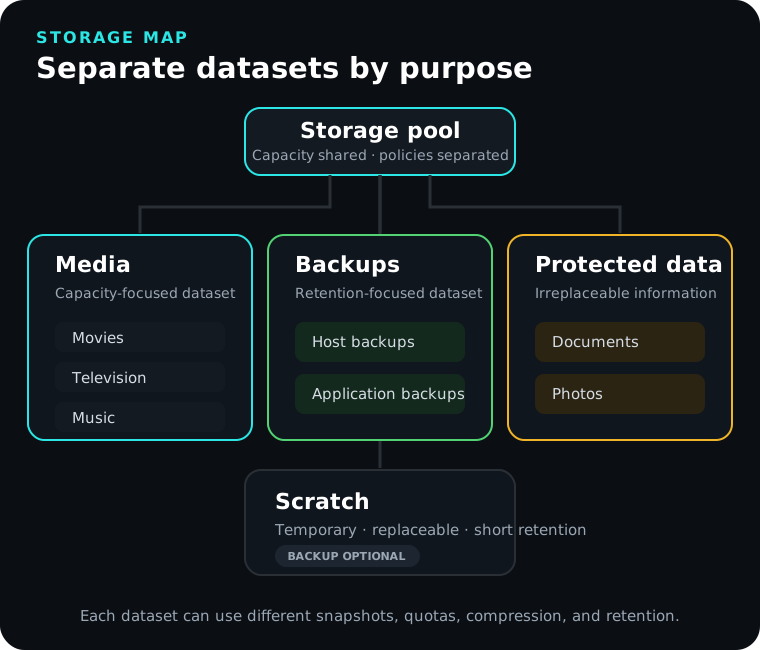
Purpose-based datasets or shares allow different snapshot, quota, retention, and backup policies.
Remote storage creates a dependency chain
If compute reaches storage over NFS or SMB, document:
- exporting host and dataset/share;
- client mount point;
- protocol and mount options;
- numeric or directory-based identity mapping;
- applications that depend on it;
- boot and retry behavior;
- what a dependent service should do if the mount disappears.
A dangerous failure is an absent remote mount leaving an ordinary empty directory. An application may happily write into the root filesystem while the real storage is offline.
Use mount dependencies, service preflight checks, or another mechanism that proves the expected filesystem is present before writers start. Monitor the mount itself, not only the application port.
Stage 7: Build the network as a trust model
A useful network is understandable before it is advanced.
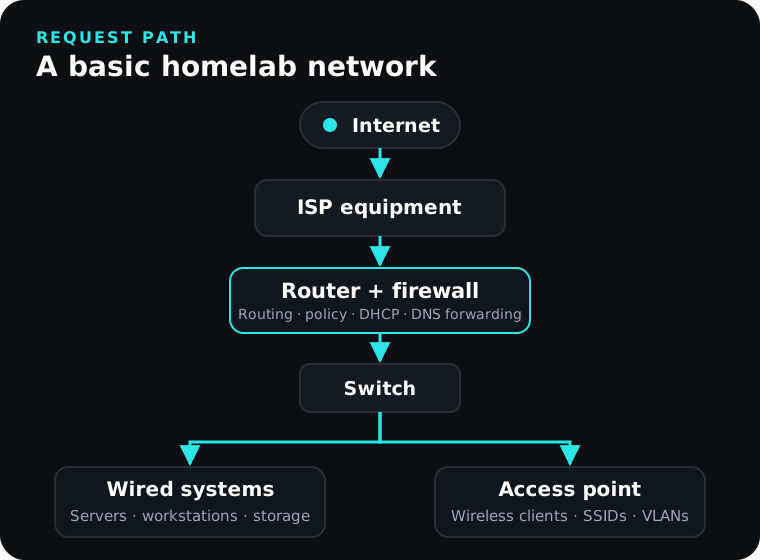
Know which device provides routing, NAT, DHCP, DNS, wireless, and firewalling. Draw the real topology privately.
Give infrastructure predictable addresses and names
Servers, switches, access points, storage, and management interfaces should not move unexpectedly.
Use DHCP reservations or carefully managed static addressing. Document subnet, gateway, DNS, and recovery access. Use names in normal operations, but keep a way to find infrastructure when DNS itself is the problem.
Add VLANs only when they express a real boundary
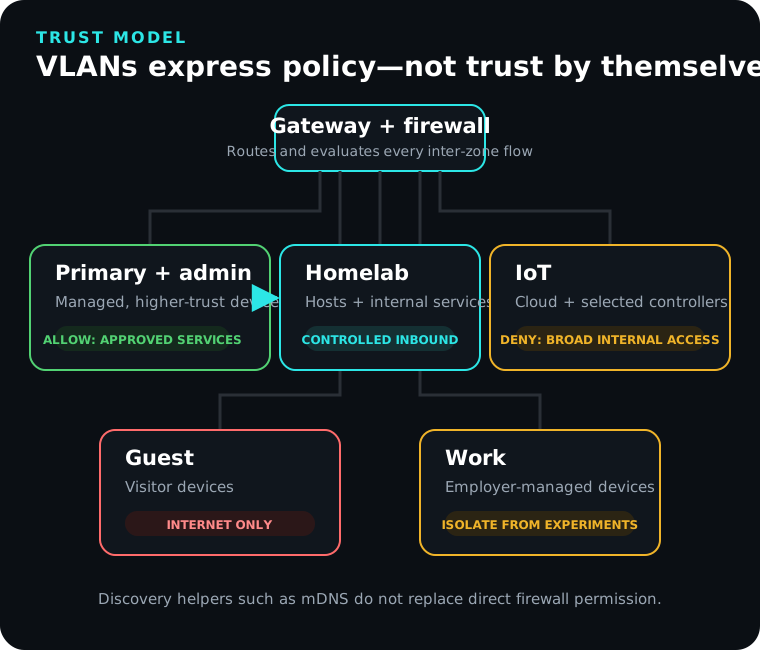
A VLAN separates Layer 2 traffic. The router/firewall turns that separation into policy.
Useful classes might include:
- trusted primary devices;
- guests;
- IoT devices;
- homelab services;
- work-managed devices;
- a dedicated management segment later, if justified.
Do not create ten VLANs because a diagram looks professional. Start with one meaningful boundary and prove the expected allowed and denied paths.
Write the communication matrix first
| Source | Destination | Purpose | Decision |
|---|---|---|---|
| Primary clients | Selected homelab services | Normal use | Allow required ports |
| Admin device | Infrastructure management | Administration | Allow narrowly |
| Guest | Internal networks | None | Deny |
| IoT | Internet | Vendor/update traffic | Allow as required |
| IoT | Primary clients | Unsolicited access | Deny |
| Application host | Storage host | NFS/SMB | Allow exact service |
| Monitoring | Managed systems | Health checks | Allow defined probes |
Then translate that matrix into the syntax of your gateway/firewall.
DNS is part of the application path
For each important service, know:
- the canonical name users should enter;
- which resolver answers it;
- whether internal and external answers differ;
- who issues its TLS certificate;
- what happens when the resolver is unavailable.
A working IP with a failing hostname is a DNS problem, not proof that “the app is down.”
Discovery across VLANs is separate from permission
mDNS reflection can make selected discovery work across routed boundaries. It does not automatically permit the actual TCP/UDP session afterward.
Troubleshoot:
- Can the client discover the device/service?
- Can it open the required connection once discovered?
Plan remote administration separately from public publishing
For administration, private identity-aware access is usually the clearest default. The Tailscale homelab guide provides a tested path for direct devices, grants, subnet routing, and recovery.
Public applications are a different decision. Reverse proxies and outbound tunnels can publish selected services, but neither substitutes for application security, patching, authentication, or logging.
Stage 8: Choose the host platform deliberately
Three common choices are worth separating.
Bare-metal Linux
Strong when the host primarily runs containers, direct hardware access matters, and you want fewer layers.
Hypervisor
Strong when VM isolation, snapshots, Windows/Linux mixtures, disposable labs, or multiple operating systems are important.
NAS/appliance platform
Strong when storage management is the primary job and the appliance model matches your operational preference.
The platform should reduce complexity for your chosen workload, not merely move complexity into a GUI.
Before trusting any host, establish a baseline:
- hostname and time synchronization;
- administrator accounts and SSH policy;
- update policy;
- storage mounts;
- firewall state;
- logging;
- SMART/pool health where applicable;
- backup agent or backup path;
- a record of the initial configuration.
Stage 9: Learn the Linux foundation before the dashboard
For Linux-oriented hosts, become comfortable inspecting the system without relying on a web UI.
Useful categories of commands include:
# Service state and recent failures
systemctl --failed
journalctl -b --priority=warning

# Storage and filesystems
lsblk -f
df -h
findmnt

# Network state
ip address
ip route
ss -lntup

# CPU, memory, and load
uptime
free -h
The exact output matters more than memorizing the command.
A management dashboard can improve daily operations later. It should not become the only way you know how to inspect the host.
Stage 10: Deploy containers as replaceable compute
Docker is a strong fit for many self-hosted applications because an image provides the application, Compose describes runtime configuration, and bind mounts or volumes preserve state.
That model is useful only when you know which state is persistent.
For each containerized service, document:
- image and update policy;
- configuration path;
- database or external database dependency;
- uploaded/user-created content;
- discardable caches;
- secrets and keys;
- UID/GID or permission model;
- networks;
- published ports;
- devices/capabilities;
- backup consistency requirements.
Use Docker’s current official installation procedure for the distribution you actually run. Docker’s Ubuntu documentation currently supports Ubuntu 26.04 LTS, 24.04 LTS, and 22.04 LTS and warns that Docker-published ports can bypass ordinary UFW/firewalld expectations. Treat Docker networking and host firewalling as one design, not two unrelated layers.
Build one complete service before a stack
Your first container should teach the lifecycle:
- define the Compose project;
- create persistent storage;
- start it;
- inspect listening addresses and logs;
- change a setting;
- recreate it;
- prove persistence;
- back up the state;
- restore the state into a disposable copy.
Installing five more containers teaches less than restoring the first one.
Keep projects bounded by lifecycle
Monitoring, media automation, reverse proxying, home automation, and game hosting may deserve different Compose projects because they have different dependencies and update windows.
Avoid one enormous project whose recreation takes unrelated services down together.
Stage 11: Add DNS, TLS, and service access intentionally
Typing IP addresses and ports does not scale well. Stable names and a reverse proxy can make the application layer easier to operate.
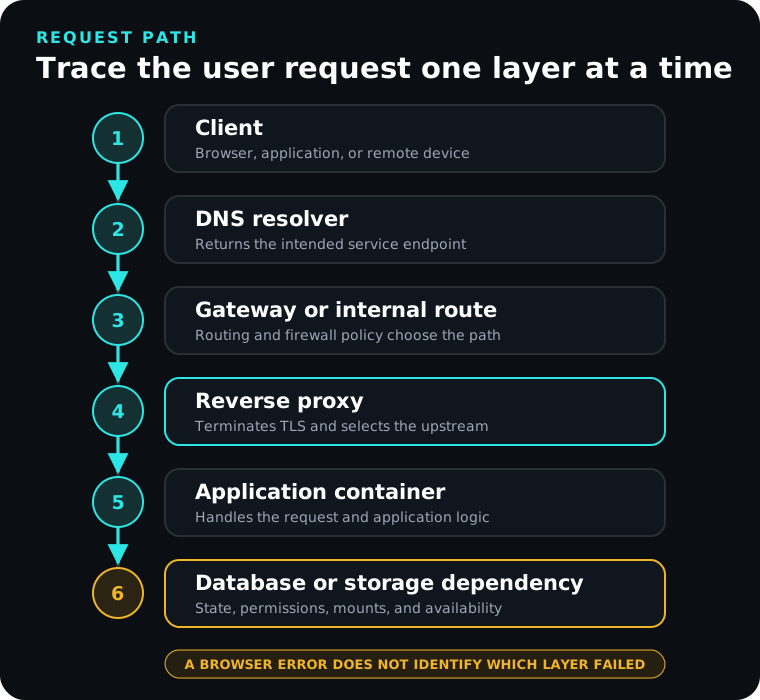
Every arrow is a separate failure boundary:
client → DNS → route/firewall → proxy → application → state/dependencyUse one proxy you understand rather than several overlapping systems. Protect DNS API tokens if automated certificate issuance uses them. Do not teach users to click through certificate warnings.
For private-only services, a Tailscale Serve design or an internal proxy may be more appropriate than public DNS and inbound exposure.
Stage 12: Add services in an order that teaches operations
A sensible progression is:
First: monitoring and a test endpoint
Prove container deployment, persistent state, local DNS, service reachability, and alert delivery with something low-impact.
Second: one service with meaningful persistence
Practice backup and restore before the service matters.
Third: a storage-backed application
Jellyfin is useful because it brings together persistent configuration, large external data, permissions, client access, and optional hardware acceleration.
Use the Jellyfin implementation guide rather than rebuilding a second incomplete Jellyfin tutorial here.
Fourth: home automation
Home Assistant can become household infrastructure quickly. Preserve physical/manual fallbacks for important lights, locks, climate, and safety-related functions. Document USB/radio dependencies, multicast behavior, broker/database dependencies, and restore boundaries.
Fifth: game servers and externally reachable workloads
Separate player traffic from the management plane. Back up world/state data. Define resource limits. Test an actual client path from outside when the service is intended to be reachable externally.
Sixth: automation stacks
Media automation introduces path, UID/GID, downloader, VPN, and service-order dependencies. Use one shared storage contract and a fail-closed network path where required.
The *arr architecture guide explains the design; the step-by-step *arr build implements it.
Stop adding services when you can no longer explain dependencies, backups, and recovery.
Stage 13: Apply a practical security baseline
A homelab does not need an enterprise security department. It does need consistent controls.
Maintain an exposure inventory
Record every inbound/public path:
- router forwards;
- tunnels;
- VPN/overlay entry points;
- public DNS records;
- vendor cloud relays;
- remote-management features.
For each, record purpose, owner, authentication, upstream service, patch responsibility, and review date.
Use unique credentials and MFA
Prioritize the domain registrar, DNS provider, source control, backup provider, email, remote-access platform, gateway account, password manager, and other control-plane services.
Keep recovery material somewhere usable when the homelab itself is unavailable.
Reduce privileges
For containers:
- avoid
privileged: trueunless justified; - avoid unnecessary host mounts;
- mount read-only data read-only;
- drop capabilities where compatible;
- use
no-new-privilegeswhere compatible; - avoid host networking by default;
- do not expose the Docker socket casually;
- keep real secrets out of committed Compose files.
Patch the whole dependency path
Updating a container does not patch the host kernel, hypervisor, router, switch, storage OS, firmware, proxy, database, or client device.
Maintain enough inventory to know what still receives security updates.
Treat encryption keys as critical data
Encryption protects only while the recovery key still exists. Back up keys separately from the system they unlock and document authorized recovery.
Stage 14: Monitor the user path and the dependencies
Monitoring should answer three questions:
- Is the service available?
- Is the underlying system becoming unhealthy?
- What changed before the failure?
Monitor more than the container process.
For an important application, useful checks may include:
- host reachability;
- user-facing HTTP/TCP endpoint;
- DNS resolution;
- certificate expiration;
- storage/mount availability;
- database health;
- free filesystem space and inodes;
- backup success and backup age;
- pool/disk health;
- UPS state where relevant.
A green reverse proxy does not prove the database works. A running Jellyfin container does not prove the media mount exists.
Alert on actionable conditions. A noisy monitor that is always ignored has failed operationally even if it is technically accurate.
Stage 15: Design backups around recovery objectives
“3-2-1” is a useful reminder, not a complete design.
For each important dataset, decide:
- acceptable data-loss window (RPO);
- acceptable restore time (RTO);
- backup frequency;
- retention;
- independent destination;
- encryption and key recovery;
- consistency requirements;
- restore procedure;
- last restore-test date.
Application backups are not always simple file copies. SQLite, PostgreSQL, MariaDB, VM disks, and live application state can require application-aware procedures or a consistent stop/snapshot window.
A backup job reporting success proves that bytes were copied. A restore drill proves whether those bytes are useful.
Restore in isolation
A good test restore uses a disposable VM, alternate path, or temporary container project so it cannot overwrite the production service.
Verify not only that it starts, but that authentication, data, integrations, permissions, and normal client behavior are correct.
Stage 16: Plan power failure and restart order
A controlled outage is a dependency test.
Document shutdown order and startup order. A typical startup dependency might look like:
network edge
→ switching/wireless
→ storage
→ compute hosts
→ databases/control services
→ applications
→ monitoring/validation
Your environment may differ.
The point is to identify which systems must exist before dependent workloads start writing or serving traffic.
Test the process before a real extended outage forces you to discover it.
Stage 17: Document the private system and the public lessons separately
Private documentation should contain the exact information required to recover the environment:
- host and device inventory;
- management addresses;
- network/VLAN plan;
- DNS records;
- storage datasets and mounts;
- dependency diagrams;
- backup locations and retention;
- exposure inventory;
- restore order;
- credential/key locations without duplicating secrets unnecessarily;
- recent change history.
Public writing can safely share architecture, sanitized examples, decision criteria, diagrams, and lessons without publishing a live inventory.
For stressful tasks, write runbooks with prerequisites, steps, validation, and rollback. “Start the service” is not the end of a recovery procedure; “prove the normal user path works” is much closer.
Stage 18: Automate a known-good manual process
Automation is valuable when it makes a process repeatable and observable.
Good early targets include:
- backups and verification;
- snapshot creation/pruning;
- certificate renewal;
- configuration export;
- health/capacity checks;
- inventory collection;
- mount/service dependencies;
- update reports.
Do the process manually first. Define success, failure, rollback, and idempotence. Then automate it.
Version sanitized Compose files, scripts, templates, and infrastructure definitions. Keep secrets out of public repositories and rotate any credential that is accidentally published, even if the visible commit is later removed.
Stage 19: Establish maintenance rhythms
The goal is to avoid both neglect and giant “update everything” weekends.
Weekly
- review failed services and alerts;
- confirm important backup jobs completed;
- check household/public services from a normal client;
- notice rapidly growing filesystems;
- identify urgent security updates.
Monthly
- perform planned application/host updates;
- review release notes for stateful services;
- inspect storage health and scrub results;
- review certificate windows and public exposure;
- test a small restore;
- update inventory after material changes.
Quarterly
- restore an important service end to end;
- review firewall rules and trust matrices;
- verify off-site backup/key access;
- test controlled shutdown/startup;
- review capacity growth;
- retire abandoned services and exposure after confirming they are unused.
Use vendor guidance and impact to adjust the calendar. The purpose is to make “never” less likely.
Stage 20: Troubleshoot one layer at a time
Calm troubleshooting is one of the most transferable things a homelab can teach.
Start by replacing “the server is broken” with an exact symptom:
A client resolves the expected service name and reaches the reverse proxy, but receives a 502 after the application container was updated.
That statement already eliminates several layers.
A useful order is:
- Define the symptom. Who, where, exact error, last known-good time, recent changes.
- Check physical/host health. Power, link, filesystem capacity, memory, degraded storage, failed services.
- Check dependencies. Storage mount, DNS, database, time, device/GPU, certificate.
- Check process/container state. Status, logs, health checks, effective configuration.
- Check local listening. Correct protocol, interface, port, and local response.
- Check name resolution. Compare working and failing clients.
- Check route/firewall. Test the exact destination port from the exact source network.
- Check proxy/TLS. Upstream address, network membership, certificate, trusted proxies.
- Compare with last known-good. Git diff, image digest, package history, change notes.
- Change one variable. Record whether the result supports the hypothesis.
After resolution, record root cause, corrective action, and what monitoring or design change would detect the condition earlier.
Three useful starting shapes
These are capability tiers, not shopping lists.
First useful host
Use an existing desktop or mini PC, one reliable SSD, the network you already have, and an independent backup destination. Add a UPS when the services become important enough to justify one.
Run Linux directly or a hypervisor with one general-purpose server VM. Build monitoring, one persistent application, and a restore procedure before expanding.
Compute plus storage
Use this when storage scale or storage administration justifies a second machine.
Define network storage protocol, identity mapping, mount dependencies, startup order, and an independent backup. Monitor the storage path from the compute host.
Virtualization lab
Use this when VM lifecycle, networks, identity, automation, or clustering are explicit learning goals.
Start with one capable hypervisor. Prove guest backup and restore. Add more nodes only after you can explain quorum, storage placement, and each failure mode.
A sanitized example of a two-host lab
My own environment illustrates how dependencies accumulate without being a template everyone should copy.
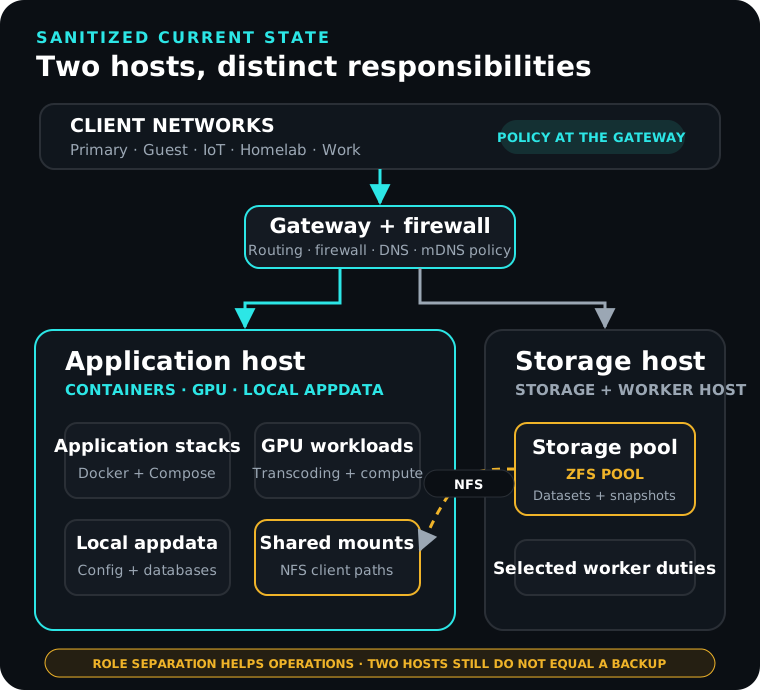
The application host runs most services. The storage/worker host owns bulk storage and exposes selected datasets to the application host. Managed routing separates device classes. Containers make application definitions repeatable, but the host still owns drivers, network configuration, mounts, persistent directories, firewall behavior, updates, and monitoring.
The strongest lesson from that design is not “use two servers.” It is that every boundary creates a contract.
If a media application cannot see a library, the possible failure points include storage pool health, dataset state, export, network policy, client mount, permissions, and the container bind mount. The diagram is useful because it tells me which boundary to test next.
If rebuilding fresh, I would establish earlier:
- standard directory conventions;
- tested backups before household adoption;
- service and dependency inventory;
- stable versus experimental environments;
- deliberate image/update policies;
- mount, certificate, storage, and backup-age monitoring;
- shutdown/startup order;
- private remote administration before exposing management UIs.
A twelve-week build roadmap
The sequence matters more than the calendar.
Weeks 1–2: goals and host foundation
- write the design brief;
- inventory hardware;
- measure power and thermals;
- install the host platform;
- configure names, addresses, time, SSH, updates, and baseline logging;
- learn to inspect services, filesystems, sockets, and routes.
Done when: you can administer the host without depending on a dashboard.
Weeks 3–4: containers and persistence
- install Docker using current official instructions if Docker is part of the design;
- build one small Compose project;
- inspect logs and effective configuration;
- recreate it and prove persistence;
- back it up and restore an isolated copy;
- version the sanitized deployment definition.
Done when: the application can be rebuilt from documentation and backup.
Weeks 5–6: names, access, and monitoring
- create internal DNS records;
- choose the intended access path;
- add TLS where appropriate;
- monitor internal and user-facing paths;
- test alert delivery;
- draw the request path.
Done when: a failed check points toward a layer rather than merely saying “down.”
Weeks 7–8: storage
- classify data;
- build/select storage topology;
- configure health monitoring;
- create purpose-based datasets/directories;
- test shared storage if used;
- prove missing-mount behavior is safe.
Done when: dependent applications cannot silently write to the wrong filesystem.
Weeks 9–10: segmentation and remote administration
- write the trust/communication matrix;
- create one useful boundary;
- implement and test narrow firewall rules;
- test DNS and discovery from relevant segments;
- deploy a private admin path such as the Tailscale design in the dedicated guide;
- remove unexplained inbound exposure.
Done when: actual behavior matches the written matrix.
Weeks 11–12: recovery and operations
- finish inventories and diagrams;
- create independent copies of important state;
- perform a complete restore drill;
- test controlled shutdown/startup;
- establish maintenance intervals;
- write the first emergency runbooks.
Done when: losing the main host would be painful, not mysterious.
The definition of “done” for a homelab service
Before calling a service operational, answer yes to these questions:
- Is its purpose documented?
- Is its persistent state identified?
- Are dependencies documented?
- Is the intended network path known?
- Is unintended exposure denied?
- Are normal users separated from administrators where appropriate?
- Is it monitored from the user path?
- Is important state backed up independently?
- Has a restore been tested?
- Is its update method documented?
- Is there a rollback/recovery point for risky changes?
- Can someone identify the last meaningful change?
That standard is more valuable than the number of services on a dashboard.
References and implementation paths
Use current upstream documentation for the exact platform you choose. The most important current references for the examples in this handbook include:
And use the tested implementation guides on this site when they match the layer you are building: